Kaeri Nashi and Burr-Free Notes: What Japanese Drawings Ask a Shop to Do
Drawings / 6 Oct 2026
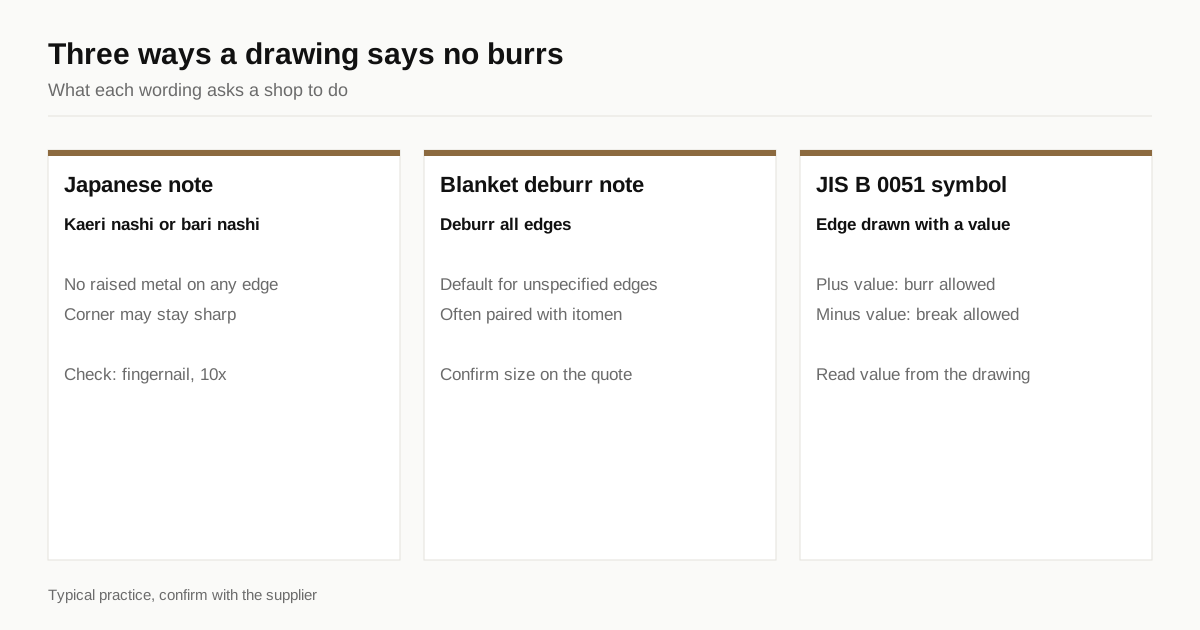
“No burrs” is the most common instruction on any machined part drawing and it is the one with the least agreed meaning. A Japanese drawing says it three ways. A small note in Japanese: カエリなし (kaeri nashi) or バリなし (bari nashi). A blanket note near the title block: バリ取りのこと, deburr. Or the JIS edge symbol, a small drawing of the edge with a number. All three ask for the same outcome, which is that the part can be handled and assembled without raised metal on any edge. How clean that has to be, and how the shop proves it, is where parts get rejected.
This guide sets out what each wording asks for, how shops remove stainless burrs and what a buyer can verify on arrival.
Three words, one instruction, three levels of care
Kaeri (返り) means the lip of metal that folds back over an edge when a tool leaves the cut. Bari (バリ) is the general word for a burr or flash. Kaeri nashi and bari nashi both mean there are none.
This is a different instruction from an edge break. Itomen and C chamfers, covered in the itomen guide, tell the shop to cut the corner. Burr free tells the shop that no metal may stand above the edge. A sharp, square edge with no burr satisfies kaeri nashi. A broken edge with a burr on it does not. When a drawing carries both notes, the shop does both jobs. When it carries only one, the quote should say which is covered.
The JIS edge symbol
For critical edges, a drawing can replace the note with the edge symbol from JIS B 0051, which is based on ISO 13715. The symbol is a small outline of the edge drawn in the corner, with a number. The sign matters:
- A plus value allows a burr up to that size above the edge.
- A minus value allows an undercut or break up to that size below the edge line.
- No value on the symbol means the limit is not stated, and the shop should ask before choosing one.
Two edges on the same part can have different symbols, so a bearing seat can be held to a small plus value while a handling edge nearby carries a minus value. If the drawing has the symbol and the shop works from the general note, the shop has ignored the stricter instruction. That is a reason to tell the buyer’s engineer where each edge sits when the quote is prepared. The exact values come from the drawing, and the symbol should be read against the standard it cites.
How much burr is too much
Neither the note nor the symbol gives a measure unless a value is written. Practice fills the gap with tests rather than numbers.
| Test | What it detects | How strict |
|---|---|---|
| Fingernail drag across the edge | Raised burr about 0.05 mm or more | Common first article check |
| Visual at 10x magnification | Raised burr about 0.02 mm | Medical, sealing and food parts |
| Cloth or cotton pull | Loose fibres that catch on a thin burr | Clean assembly work |
| Optical comparator or microscope | Burr height as a measured number | When a value is written |
| Borescope in a bore | Burrs at cross holes | Hidden intersections |
The numbers in the table are common practice and not part of the standard. A buyer who needs a measured limit should give one in microns and name the test, so the shop and the inspector use the same method.
How shops remove burrs from stainless
Stainless needs more deburring effort than carbon steel for the reasons set out in the itomen guide: the burr is tough and rolled and it work hardens. The methods are chosen by access and volume.
| Method | Reaches | Suits | Watch for |
|---|---|---|---|
| Chamfer or deburr cut in the CNC program | Outer edges and bore mouths | Every production part | Needs the tool path and tool in the program |
| Back-chamfer or cross-hole deburring tool | Hole intersections | Manifolds, fittings | Wear on the cutter, tool length |
| Hand file, stone or scraper | Anything within reach | Prototypes, odd edges | Varies by operator |
| Abrasive nylon brush | Open edges | Light burrs | Do not use a plain steel brush on stainless |
| Vibratory or barrel finishing | Whole part, external | Small parts in volume | Part to part knocks, size change |
| Abrasive flow | Inside passages | Complex internal channels | Cost, tooling |
| Thermal energy method | Hidden burrs | High value manifold work | Equipment and setup cost |
| Electropolishing | Micro burrs | Clean and food parts | Removes a few microns, removes only small burrs |
One rule is worth marking. A carbon steel brush on stainless deposits iron on the surface, and the iron rusts. This is the most common way a finished stainless part develops orange spots after it leaves the shop. Brushes and abrasives for stainless should be used for stainless only, and the passivation article covers how to remove embedded iron if it has happened.
What a burr does after delivery
A burr is not cosmetic. It has three ways of causing a failure, and the failure usually shows up at the customer, not in the shop.
It changes the fit. A burr on a shaft shoulder lifts the mating part off its seat by the height of the burr. At a few hundredths of a millimetre that is enough to put a bearing out of square, and the fit guide shows how little clearance a precision fit has to spare.
It breaks loose. Tool marks and rolled burrs flake off under vibration, thermal cycling or the first wash cycle. A flake the size of a grain of sand is enough to score a sealing face or jam a small valve.
It carries the corrosion problem. The root of a rolled burr on stainless is a crevice. Moisture and chlorides sit in it. On a part for a wet or salty environment, a burr left on an edge is a place where corrosion starts, even on a grade that would normally resist it.
The same logic is why a drawing for a pump, valve or food contact part reads the burr-free note strictly, while a decorative cover plate does not.
Burr free and surface finish are separate calls
Buyers sometimes expect that asking for a fine surface finish also asks for burr-free edges. It does not. A face finished to Ra 0.8 can still carry a burr at its boundary, because finish describes the flat of the surface and the burr sits on the edge. The two instructions are written in separate places on the drawing and checked in separate ways. For finish symbols, see the surface finish guide.
The same applies to sequence. If the part is to be ground or lapped after machining, the burr must come off before, because a burr in a grinding fixture marks the face. If the part is to be passivated or electropolished, deburring comes before that step. Mentioning the finishing route in the quote request lets the engineer plan the order of operations so the edge work happens at the right time.
Where kaeri nashi is read most strictly
The note goes onto almost every Japanese drawing, but a few part types treat it as a hard requirement:
- Sealing parts. A burr on a sealing edge cuts an O-ring or keeps a gasket from seating.
- Fluid and food parts. A loose burr ends up in the product. For food equipment, see the food machinery guide.
- Press and slip fits. A burr on a bore mouth shaves metal off the pin as it goes in.
- Moving assemblies. A burr that breaks off in a bearing or a slide can seize it.
- Medical and clean parts. Particles are a quality failure by themselves.
On a bracket or a cover plate, the same words mean something looser, and a shop that treats them the same on both is either over-deburring or under-deburring. Saying what the part does in the quote request avoids that.
Checking burr-free on delivery
An engineer follows every order and inspects edges before the parts are packed. A buyer receiving the parts can run three quick checks without any special equipment:
- Run a fingernail along every edge of three or four sample pieces. A burr catches.
- Look at hole mouths and cross hole intersections with a loupe or a phone camera in macro mode, with a torch held at a low angle.
- Wipe the part with a lint-free cloth and look for fibres left on the edges.
Photographs of the edges on the first article, sent with the inspection report, are usually enough to approve the standard before the batch is made.
How to write it so it is clear
- State the default: “all edges burr free, edge break 0.2 mm max” covers most parts.
- Call out the exceptions with the JIS B 0051 symbol: sealing edges, press fit lead-ins, knife edges.
- Name the test: fingernail, 10x or a measured limit.
- Say whether internal intersections are included.
- Say when the deburring happens relative to passivation or polishing.
If your drawing has only the Japanese note, send it for a quote. The engineer reads the note, asks about the edges that need a stricter standard, and puts the confirmed instruction on the order. The quality page describes what the inspection before packing covers, and the drawing checklist lists other items to confirm.
Questions
What is the difference between kaeri and bari?
Both mean burr. Kaeri, written with the character for return, usually points at the rolled-over lip of metal left on an edge. Bari is the general word for any burr or flash. On a drawing the two are treated as the same instruction: no burrs.
Does burr free mean the edge must be chamfered?
No. Burr free means no raised or loose metal on the edge. The corner itself can stay sharp unless the drawing also gives an edge break note such as itomen or a C chamfer.
What is the JIS B 0051 edge symbol?
It is the JIS edge-condition symbol, based on ISO 13715. It draws the edge shape and gives a value, where a plus sign allows a burr up to that size and a minus sign allows an undercut or break of that size. Read the values from the drawing itself.
Have a drawing for a stainless part?
Send it and an engineer reads the title block, quotes it within 24 business hours, and if you order we place, manage, inspect and ship the parts on one PO and one invoice.
Get a quoteRelated guides
SUS303Se and SUS303Cu Compared with SUS303: Which Free Cutting Grade to Use
SUS303Se and SUS303Cu against standard SUS303: what selenium and copper change for finish, cold forming and corrosion, and what a drawing should state.
SUS Spacers and Collars to JIS Drawings: What Drives the Price of Small Lots
How stainless spacers and collars are made from JIS drawings in small lots: length and parallelism, bore and set screw details, stack-up and price breaks.