Itomen and C Chamfer Notes on JIS Drawings: What a Shop Cuts for Each
Drawings / 11 Oct 2026
Open a Japanese drawing and you often find a small note near the title block: 指示なき角部は糸面取り, or in English, “unspecified edges: itomen”. It is one line, easy to miss and easy to misread. It tells every machinist on the job what to do with every edge the drawing does not describe, which on a typical stainless part is dozens of edges. Getting that line wrong either leaves sharp edges on a part that was supposed to be handled safely or removes metal that was meant to stay.
This guide explains what itomen and the C-number chamfers mean, what shops actually cut and how stainless changes the work.
What the words mean
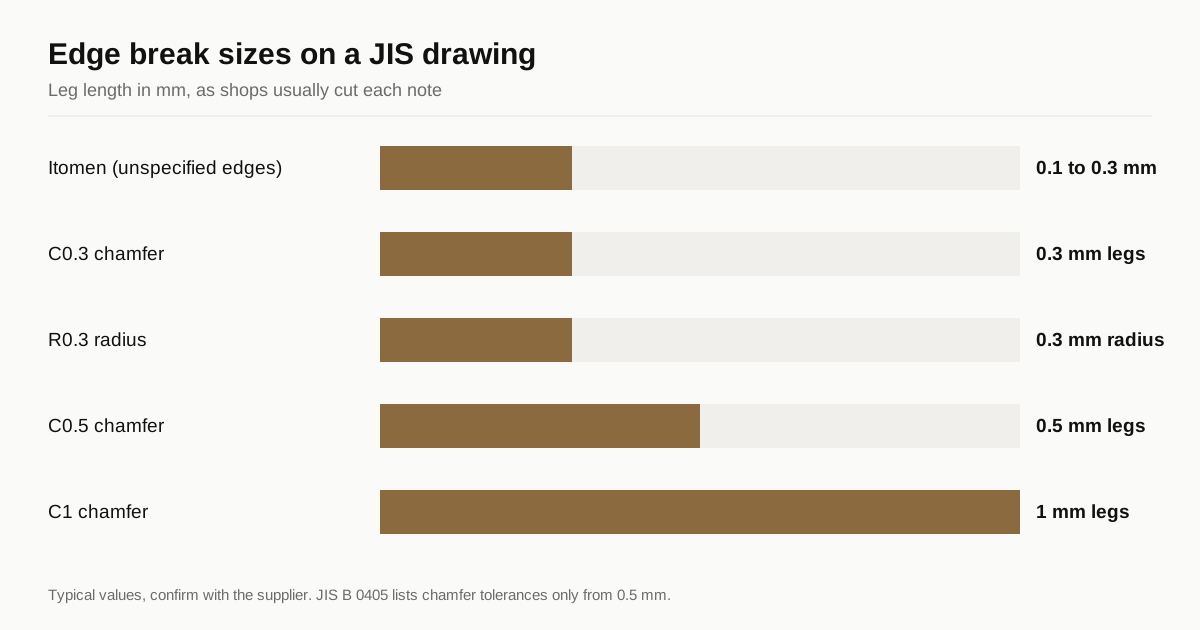
Itomen (糸面取り) is a chamfer so small it looks like a thread running along the edge. Nobody agrees a single dimension, so it is a convention and not a standard value. Most Japanese buyers and many shops treat it as an edge break of about 0.1 to 0.3 mm. The aim is to take off the sharp corner, not to leave a visible chamfer.
C (C面取り) is a 45 degree chamfer where the number is the leg length. A C1 chamfer is 1 mm along each face. A C0.5 chamfer is 0.5 mm along each face and about 0.7 mm across the cut.
R is a radius. R0.3 on an edge is a rounded corner of 0.3 mm radius.
The standard JIS B 0405 does give tolerances for chamfers and external radii, but only from 0.5 mm upward. Below that it says nothing. This matters because itomen sits in the gap. The same standard, in its familiar form, gives plus and minus 0.2 mm for sizes of 0.5 to 3 mm and plus and minus 0.5 mm for over 3 up to 6 mm. For a C0.5 chamfer, plus and minus 0.2 mm is a large share of the size, so a drawing that cares about a chamfer should say how tight it is. The general tolerance guide covers that table.
How a shop reads each note
| Drawing note | Common shop reading | Typical size on the part | How it is usually cut |
|---|---|---|---|
| Itomen (unspecified edges) | Remove sharp corner, no visible chamfer | 0.1 to 0.3 mm | Chamfer tool in the program or a deburring tool |
| C0.3 | 45 degree chamfer, 0.3 mm legs | 0.3 mm | Chamfer mill or turning insert |
| C0.5 | 45 degree chamfer, 0.5 mm legs | 0.5 mm | Chamfer mill or turning insert |
| C1 | 45 degree chamfer, 1 mm legs | 1 mm | Chamfer mill or turning insert |
| R0.3 | Round the corner, 0.3 mm radius | 0.3 mm | Radius tool, form tool or ball mill |
| Burr removal only | Remove burrs, edge may stay sharp | Not measured | Deburring tool, brush or hand finish |
The last row shows why one wording is not enough. “Remove burrs” and “break edges” are different instructions. A part with burrs removed can still have a razor edge. A part with a 0.2 mm edge break has no sharp corner.
Why stainless makes edges harder
Aluminium and mild steel throw a thin, brittle burr that falls off. Austenitic stainless does not. SUS304 is tough and ductile, so the cutting edge pushes the metal over the edge as a rolled burr that stays attached. It is often wider and more stubborn than the same burr on carbon steel, and it work hardens, which makes the second attempt at removing it harder than the first.
Three consequences follow.
Burrs are created on the exit side. The burr forms where the tool leaves the part. A bore breaking out into a cross hole, a turned shoulder or a slot end all carry exit burrs. Every intersection is an edge to check, which is why the drawing note needs to cover them all.
Tool wear raises burr size. A worn insert or end mill pushes more metal than it cuts. Burr height tells the operator when to change the tool, and a shop that checks edges regularly changes tools earlier.
The best deburring is the one that happens in the program. A chamfer cut by the machine tool is the same size every time and costs seconds of cycle time. A manual deburr by file or stone varies between parts and between people. For production parts the standard approach is to build the chamfer into the program for every edge the tool can reach, then use a manual or brush pass only for edges it cannot.
Where chamfers carry a job
Not every edge needs the same care. These are the common functional ones:
- Lead-in on bores for pins. A pin entering a press fit or a close sliding fit needs a chamfer, often C0.3 to C0.5, or it cuts a burr off the housing on assembly.
- Thread ends. An entry chamfer at the start of a tapped hole or an external thread protects the first thread and lets a screw start. See the thread callout guide.
- Sealing edges. An O-ring groove or a gasket seat calls for a specified radius or chamfer. This is not an itomen job. A sharp edge cuts a seal. A heavy break leaves a leak path.
- Handling edges. Anything a person grips, from food equipment to medical parts, needs a safe edge. Here the edge break is a safety feature as much as a drawing note.
- Edges that take a coating or finish. Passivation and electropolishing both follow the edge shape. A sharp edge polishes unevenly, while a small radius gives a more uniform finish.
Holes, threads and internal corners
Edges inside the part are where a general note runs out. A hole that crosses another hole leaves a ridge at the intersection that no cutter on the outside can reach. A blind hole with a flat bottom has a sharp internal corner that a drill leaves at 118 degrees. A thread started from a chamfered face has a burr at the bottom of the chamfer, because the tap pushes metal ahead of it.
Shops handle these with specific tools: a cross-hole deburring tool on a spring, a back-chamfer tool that cuts on the way out, or a thermal or abrasive-flow step for parts with many hidden intersections. All of them add cost. A drawing that says “all edges itomen” on a manifold with ten cross holes is asking for a process the quote should name. If it is not asking for that, the note should say that internal intersections are excluded.
Stainless adds one more complication. A burr left inside a bore that is later passivated or electropolished is not removed by the bath. Acid will not dissolve a rolled burr cleanly, and a loose burr can break off in service. The right order is to deburr first, then finish. The passivation guide has the sequence.
What drives the price
An edge note does not look like a cost driver, but it can be one. The factors are:
- Edge count. A plain turned pin has four edges. A manifold block can have a hundred.
- Reach. Edges a standard tool can reach in the main program cost seconds. Edges that need a second setup or hand work cost minutes.
- Consistency required. A visual standard of “no sharp edges” is cheap. A measured C0.3 plus and minus 0.1 on every edge needs inspection time.
- Volume. At a hundred pieces a hand pass is acceptable. At ten thousand it has to be in the program.
A good quote lists the edge treatment assumed so the price is clear on what is covered. If the buyer wants a different standard, the figure changes in a way both sides can see.
Checking an edge
A 0.2 mm edge break is too small to measure with a caliper. Shops check it three ways: a loupe or a magnifier to look at the edge, an optical comparator or a measuring microscope for a numeric size, and a fingernail or a thread of cloth for sharpness. If the drawing needs a measured chamfer size, say so, and say how many edges, since measuring every edge on a part with fifty of them is a significant inspection job.
For first articles, a sample photograph of the edge condition on three or four critical edges is faster than words. It also gives the buyer something to approve before the batch runs.
Writing the note so nobody guesses
The shortest reliable note covers four things:
- The default for every edge not otherwise dimensioned, for example “break all edges 0.2 mm max”.
- The exceptions, such as sealing edges and lead-ins, each with their own call-out.
- The measurement basis, either “visual” or a stated size with its tolerance.
- Any edge that must stay sharp, such as a knife edge or a gauge face, called out explicitly.
If the drawing arrives with only the itomen note, that is fine. When you send the drawing, the engineer reads the note, asks the owner to confirm a size where the part needs one and states the assumption on the quote. The shop receives the confirmed size on the order and the engineer checks edge condition at inspection before packing. For the related burr-free wording, see the kaeri nashi guide. The drawing checklist lists the other items worth confirming before you send.
Questions
What does itomen mean on a drawing?
Itomen literally means thread face. It is a very small edge break, a chamfer or radius barely wider than a thread of cloth. Shops commonly read it as roughly 0.1 to 0.3 mm at 45 degrees, but the number is not fixed by the standard, so it should be confirmed on the quote.
What does C0.5 mean?
C followed by a number is a 45 degree chamfer where the number is the leg length. C0.5 is a chamfer with both legs 0.5 mm, so the cut face measures about 0.7 mm across.
Can a shop leave edges as machined if the drawing says nothing?
A sharp edge is still a defect on most buyer drawings because it cuts hands and starts cracks. If the drawing has no edge note, the quote should state what the shop will do, normally a light edge break, and ask the buyer to confirm.
Have a drawing for a stainless part?
Send it and an engineer reads the title block, quotes it within 24 business hours, and if you order we place, manage, inspect and ship the parts on one PO and one invoice.
Get a quoteRelated guides
SUS303Se and SUS303Cu Compared with SUS303: Which Free Cutting Grade to Use
SUS303Se and SUS303Cu against standard SUS303: what selenium and copper change for finish, cold forming and corrosion, and what a drawing should state.
SUS Spacers and Collars to JIS Drawings: What Drives the Price of Small Lots
How stainless spacers and collars are made from JIS drawings in small lots: length and parallelism, bore and set screw details, stack-up and price breaks.